This article will talks about on how you can manage to restrict a specific or group of network computers in accessing a specific websites on the internet. Pfsense has a great tool for site restrictions or web filtering through the use of proxy filter packages like Squid and SquidGuard. Squid and SquidGuard are responsible for the restrictions or blocking of websites accessed by network users or computers. You must install this two packages to have this pfsense capability on website access restrictions. Bellow is a step-by-step guide on how you can implement Squid and SquidGuard in your pfsense network to restrict users from accessing prohibited websites.
Download and install Squid and SquidGuard packages in Pfsense.
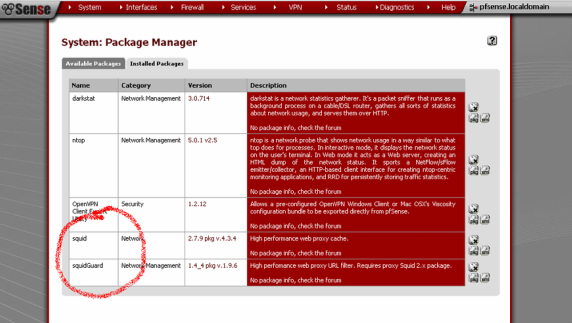
1. Go to pfsense menu System -> Packages and click on Available Packages.
Find Squid and SquidGuard. Click the plus button to add these packages one at a time.
Squid is the proxy server and SquidGuard is the proxy filter. Pfsense will do the installation automatically.
When the two packages already installed, just look at the Installed Packages tab if all went correctly.
2. Configure Proxy server general settings. Go to pfsense menu Services -> Proxy Server
Proxy Interface - Default is LAN. This is the interface the proxy server will bind to.
Allow users on interface - If this field is checked, the users connected to the interface selected in the 'proxy interface' field will be allowed to use the proxy. This will be checked.
Transparent Proxy - If transparent mode is enabled, all request for destination port 80 will be forwarded to the proxy server without any additional configuration necessary. This will be check also.
Bypass proxy for Private Address space destination - N/A
Leave other configuration in the default settings and then click save button.
On upstream proxy tab, you can enable forwarding that enables the proxy server to forward requests to an upstream server. Just leave this tab to its default. You can also configure the Cache Mgmt tab if you want. This sets the storage sizes available for cached objects. Just also leave this to its default settings.
On Access Control tab, set the allowed subnets separated in a new line that allowed to use the proxy.
Example, 192.168.0.0/24, this network will allow to use the proxy. All computer from this network can be regulated for web access restrictions. Leave others to default. If you know what you are doing, then you can set other configuration if you want.
3. Go to Services -> Proxy Filter to configure Proxy Filter SquidGuard general settings tab.
Enable - check this to enable squidGuard. This is responsible for web filtering traffic.
Blacklist - check this on Blacklist Options. This will be a blacklist of all website categories.
Blacklist Url - http://www.shallalist.de/Downloads/shallalist.tar.gz this is the path of the blacklist.
You can download blacklist and install in pfsense in the blacklist tab and supply the blacklist url above and hit download button.
After you download the blacklist, go to Common ACL tab.
Click on target rules list and choose target categories you want to block or deny. This will apply to all computer belongs to the network specified in the Proxy.
Do not allow IP-Addresses in Url - check this one.
Proxy Denied Error - Write your access denied error messages if you want or leave the default.
Redirect Mode - int error page
Use safe search engine - if you want to protect children from accessing adult sites.
Rewrite - choose rewrite options if you have.
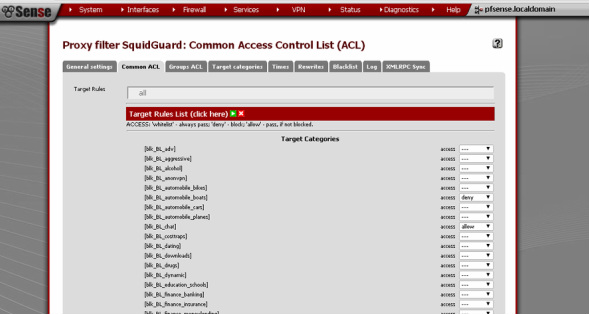
Pfsense Common Access Control List
To restrict a group of computers you need to specify first the times. Go to the Times tab in Proxy filter SquidGuard. Add a new item specifying the time range.
Name - create the name you want of the time the group is restricted. Example - Restrict facebook.
Values - choose from weekly or date. Days - all, and specify the time range. The end time is your off-time. This indicates that after off-time the group ACL is activated. Example, 00:00-07:00, after 7am facebook will be blocked. Click save button.
Go to Groups ACL tab and add a new item for the group acl.
Name - create a name for the group.
Client Source - The clients or users IP adresses that you want to include in the group.
Example : 192.168.0.2 192.168.0.10 or IP ranges 192.168.0.2-192.168.0.5 or
192.168.0.0/24 or a domain ( groupdomain.com) or user1.
Time - the name of time range you have created.
Target Rules - specify target categories for off-time. Choose either you want to block or allow a specific type of site. If time is not define, this will be ignored.
Do not allow IP addresses in Url - check this. Click on save button.
You can also specify target categories or a specific site that will be blocked on Target categories tab.
On Domain list - type the domain/s you want to block. Ex. facebook.com
Url list - the url you want to block. Ex. facebook.com/user.
That's it. I hope you get this tutorial. Thanks for reading.
